Maintaining a plow’s performance hinges on the meticulous care of its most critical moving parts. Proper inspection of plow bearings and pins not only ensures efficient soil cultivation but also extends the life of your equipment. This guide offers practical plowing tips and a thorough walkthrough to help you keep bearings and pins in peak condition, minimize unexpected downtime, and boost overall productivity.
Understanding Plow Bearings and Pins
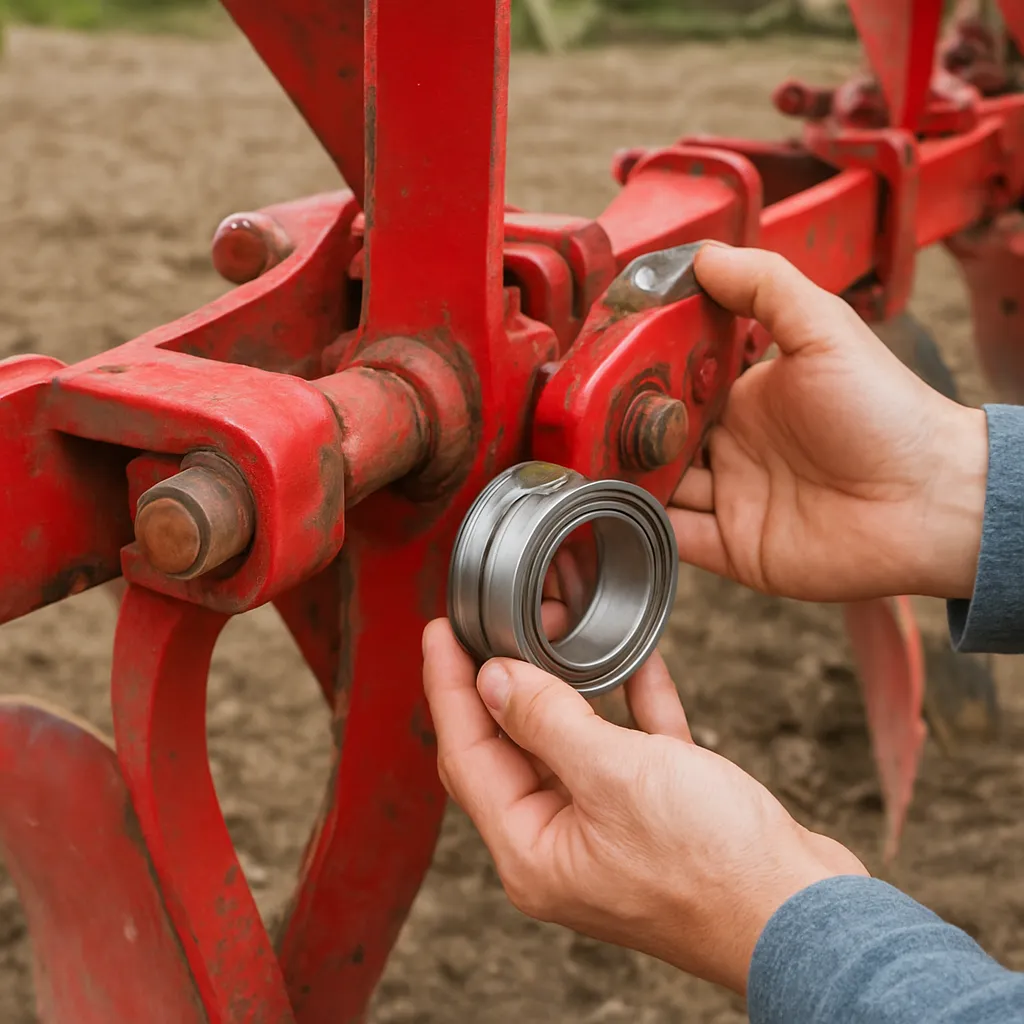
Plow bearings and pins serve as the underlying framework that allows moldboards, shanks, and discs to pivot and move under heavy loads. Without robust bearings, friction increases, generating heat that accelerates wear. Faulty pins can cause misalignment, uneven furrows, and even structural damage over time. Proper awareness of each component’s role is essential for effective maintenance.
Types of Bearings Used in Plows
- Roller bearings: Cylindrical rollers handle high radial loads and are common in heavy-duty plows.
- Ball bearings: Provide smooth rotation under lighter loads and are easier to replace.
- Bushing bearings: Made of bronze or plastic composites; ideal for lower-speed pivot points.
The Role of Pins and Bushings
Pins secure plow segments together, facilitating controlled pivot. Over time, surrounding bushings wear out, creating play in the joint. Excessive looseness leads to inconsistent angle settings and uneven soil turnover. Regular checks can identify early signs of pin corrosion or deformation.
Step-by-Step Inspection Process
Implementing a systematic inspection routine will catch potential failures before they become costly repairs. Follow these key steps:
- Pre-inspection cleaning
- Visual assessment for damage
- Manual feel for excessive movement
- Measurement of wear thresholds
- Lubrication and reassembly
1. Pre-Inspection Cleaning
Start by removing caked-on soil, debris, and residue from all connection points. A wire brush and pressure washer can clear contaminants that mask cracks or wear marks. Ensure surfaces are dry before continuing to the next step.
2. Visual Assessment
Check each bearing housing for hairline cracks, rust pitting, or metal flaking. Examine pins for signs of bending or scoring. Any uneven discoloration indicates high-heat spots from friction—these areas require special attention.
3. Manual Play Test
Grasp the moldboard near its pivot point and attempt to wiggle it. A minor amount of free movement is normal, but excessive clearance means bushings or bearings have worn beyond acceptable limits. Document the degree of play to compare across future inspections.
4. Measuring Wear
Use calipers or a feeler gauge to measure bearing inner diameter and pin diameter. Compare readings to manufacturer’s tolerances. For example, if the nominal pin diameter is 1.5 inches and wear exceeds 0.02 inches, replacement is recommended to maintain proper alignment.
5. Lubrication and Reassembly
Clean bearing races and pin sleeves thoroughly. Select a high-quality, water-resistant grease with the correct NLGI grade as specified in your operator’s manual. Apply grease evenly around the bearing surfaces and pins, ensuring no metal-to-metal contact remains unprotected. Reassemble components, torqueing fasteners to recommended specifications.
Maintenance and Replacement Tips
A proactive approach to replacement and routine care will save time and money in the long run. Knowing when to replace and how to maintain parts is crucial in avoiding in-field breakdowns.
Determining Replacement Intervals
- Heavy-use scenarios (e.g., clay soils): Inspect monthly and replace at first sign of wear beyond tolerance.
- Light-use scenarios (e.g., sandy soils): Inspect quarterly; bushings may last a season or two.
- Extreme environments (high moisture, corrosive soils): Consider stainless or corrosion-resistant alternatives and inspect more frequently.
Choosing Quality Components
OEM parts typically meet exact manufacturer standards, but premium aftermarket options may offer improved durability and corrosion resistance. When selecting replacements:
- Verify material composition (e.g., heat-treated steel, bronze bushings).
- Ensure dimensional accuracy: pins and bearings must match original specifications.
- Look for sealed-bearing designs to prevent grit ingress.
Preventive Measures for Longevity
Simple habits can significantly prolong the service life of plow bearings and pins, reducing maintenance frequency and overall costs.
Regular Greasing Schedule
Establish a greasing routine based on usage hours and environmental conditions. For most plows, greasing every 10–20 hours of operation is ideal. Always use high-performance lubricants rated for heavy-duty agricultural equipment and remove old grease before adding fresh grease to prevent mixing with contaminants.
Environmental Protection
Expose your plow to minimal humidity and chemical agents when storing. Applying a thin film of anti-corrosion spray to pins and exposed shafts helps block air and moisture. Covering the equipment with breathable tarps or storing in a well-ventilated shed further increases component life.
Alignment and Adjustment Checks
Incorrect moldboard angle and improper coulter depth can place uneven loads on bearings and pins, accelerating wear. Conduct quick alignment checks at the start of each season and monitor adjustments in the field. A slight misalignment left unchecked can lead to premature failures.
Operator Training and Best Practices
Ensure that anyone operating the plow understands the importance of gradual loading. Avoid sudden stops, jerky turns, or backing up on hard obstacles. Such maneuvers can shock-load pins and bearings, causing immediate or cumulative damage.