Plow hitch alignment plays a pivotal role in achieving an efficient and **consistent** tilling pattern. When the hitch is properly set up, you’ll experience reduced **vibration**, better soil penetration, and less **wear** on both the tractor and plow components. This guide delves into the technical aspects of maintaining **proper** hitch geometry, outlines step-by-step adjustment procedures, and highlights routine inspections that will keep your equipment in peak condition.
Understanding Plow Hitch Geometry
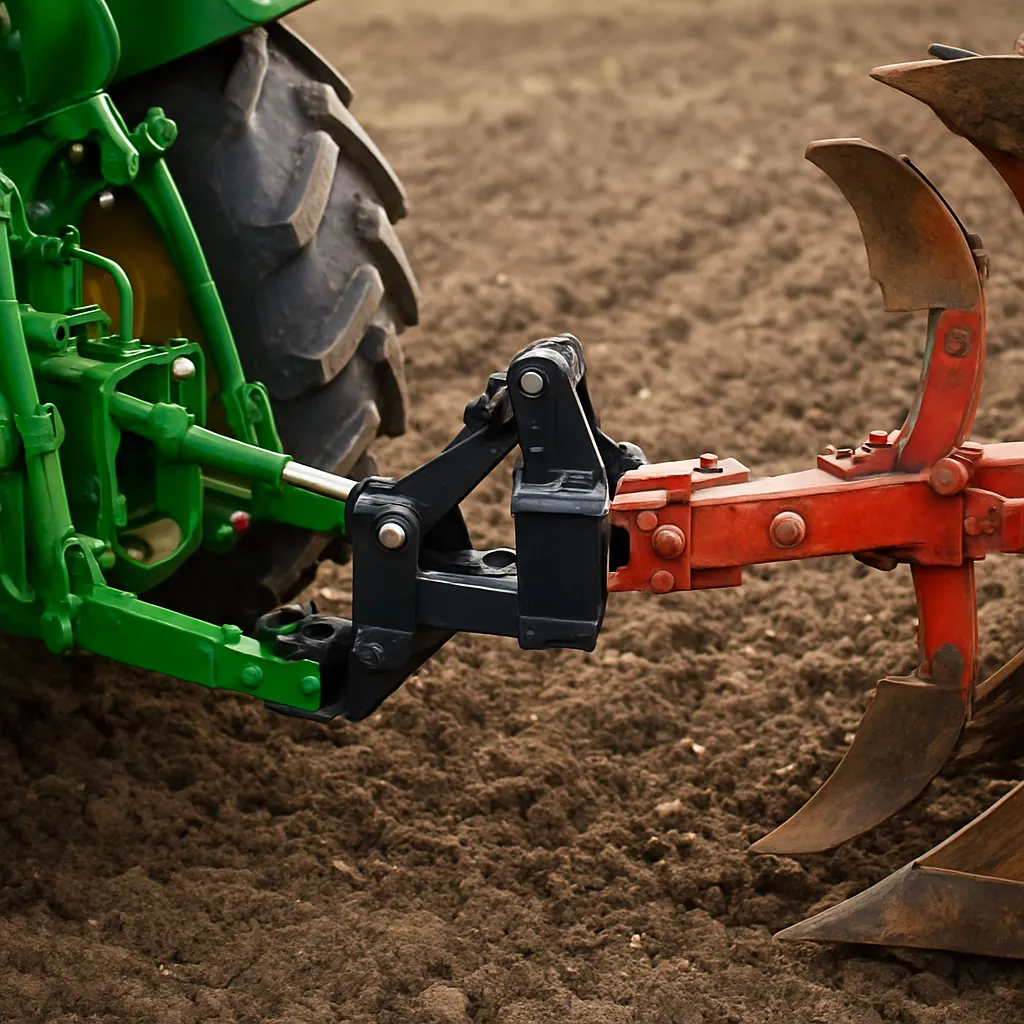
The relationship between your tractor’s three-point hitch and the plow beam determines how the share cuts through the soil. Misalignment can cause the plow to lean to one side, resulting in an uneven furrow depth and increased fuel consumption. Key factors influencing hitch geometry include the height of the top link, side-shift position, and draft angle. Mastering these elements will set the foundation for flawless plowing operations.
Critical Alignment Components
- Top Link Length: Controls pitch and draft angle.
- Lower Lift Arms: Must be parallel to the plow beam.
- Side-Shift Mechanism: Ensures lateral centering under load.
- Draft Control: Maintains consistent depth under varying soil conditions.
- Stabilizers or Turnbuckles: Prevent unwanted lateral movement.
Adjusting Hitch Alignment Step by Step
Follow these instructions carefully to achieve pinpoint **accuracy**. Before you begin, park on a **level** surface and engage the parking brake. Ensure the plow is clean and free from **debris** to avoid false readings.
Step 1: Positioning the Tractor
- Center the tractor on a firm, flat area.
- Lower the plow until the moldboard is off the ground by about 15–20 cm.
- Chock the wheels and turn off the engine for safety.
Step 2: Setting Top Link Height
- Measure from the hitch pin on the plow to the tractor’s top link eye.
- Adjust the top link so that the plow beam is nearly parallel to the ground.
- Lock the top link in place with its locking nut or clip.
Step 3: Leveling Lower Lift Arms
- Retract or extend stabilizers until both arms are equidistant from the plow beam.
- Use a straightedge across the plow beam to confirm parallelism.
- Tighten all pinch bolts to the manufacturer’s specified **torque**.
Step 4: Adjusting Side-Shift
- With the plow raised slightly, engage the side-shift control.
- Center the plow directly under the tractor’s rear axle.
- Secure the side-shift lock once alignment is achieved.
Routine Maintenance and Inspection
Regular checks prevent small issues from escalating into costly repairs. A monthly inspection regime should focus on fasteners, wear components, and hydraulic connections. Maintain comprehensive records of all adjustments and replacements.
Daily Visual Checks
- Inspect shear bolts and replace any with visible deformation.
- Verify that hydraulic hoses are free from cuts or bulges.
- Look for cracks or weld fractures on the hitch frame.
Weekly Mechanical Inspection
- Confirm that all hitch pins and linchpins are secure.
- Grease pivot points according to the plow manufacturer’s schedule.
- Check gauge wheel adjustment for consistent furrow depth.
Monthly Alignment Audit
- Re-run the step-by-step leveling procedure outlined above.
- Test plowing at low speed to detect any drift or veer.
- Record any changes in top link measurements for trend analysis.
Troubleshooting Common Alignment Issues
Despite meticulous maintenance, alignment issues can arise. Addressing them early minimizes downtime and protects against **premature** part failure. Below are typical symptoms and solutions for hitch misalignment.
Problem: Uneven Furrow Depth
- Potential Cause: Top link too short or long.
- Solution: Readjust top link until the plow beam is balanced left-to-right.
Problem: Plow Pulls to One Side
- Potential Cause: Side-shift misaligned or stabilizers uneven.
- Solution: Center the plow under the rear axle, then lock side-shift controls.
Problem: Excessive Vibration
- Potential Cause: Worn pivot bushings or loose hitch fasteners.
- Solution: Replace bushings, tighten all bolts to specified torque values.
Problem: Depth Fluctuations in Hard Soil
- Potential Cause: Faulty draft control setting.
- Solution: Calibrate draft sensing arms per operator’s manual to ensure constant soil engagement.
Problem: Hitch Binding During Turns
- Potential Cause: Insufficient clearance between the plow and tractor frame.
- Solution: Adjust stabilizer choke or replace with adjustable-length turnbuckles.
Key Takeaways for Optimal Alignment
- Accurate hitch alignment reduces fuel consumption by up to 15%.
- Regular inspections extend the lifespan of critical components such as the moldboard and draft link.
- Properly centered plow hitches yield uniform seedbeds, promoting better plant emergence.