Setting up a two-bottom plow correctly is crucial for achieving consistent and efficient soil turnover. Proper configuration ensures uniform furrow formation, reduces equipment strain, and conserves fuel by allowing the tractor to work at optimum load. This article covers essential tips for evaluating field conditions, hitching and adjustment procedures, fine-tuning for performance, pre-operational safety checks, maintenance strategies, troubleshooting common issues, and integrating conservation practices.
Understanding Field Conditions and Equipment Requirements
Before preparing your field, consider the texture and moisture content of the soil. Heavy clay soils may require less working depth initially, while sandy loam can tolerate deeper cuts. Evaluate residue levels from previous crops and remove excessive plant matter that could clog the moldboards. Inspect your plow’s frame and components for wear, paying close attention to the moldboards, landsides, and adjusting mechanisms. Choosing a plow with reversible moldboards can extend service life and allow you to double the time between refurbishing.
Addressing field irregularities like rocks, roots, and knobs will help preserve both the plow and the tractor. A preliminary pass with a coulter expander or disk harrow can break up clods and reduce stress on hitch points and beams. Mapping out drainage patterns and high-traffic zones will prevent unexpected soil compaction and uneven alignment when you begin mainline plowing.
Pre-Operational Safety and Preparation
Perform these checks to prevent accidents and equipment damage before hooking up the plow:
- Verify that all guards and shields are in place around moving parts to avoid entanglement risks.
- Inspect hydraulic hoses for pinholes, bulges, or leaks; tighten loose fittings and replace damaged lines.
- Ensure the operator’s station is free of debris, seat belts are functional, and roll-over protection is intact.
- Test emergency shut-off mechanisms and cycle hydraulics under low pressure to confirm responsiveness.
- Wear proper personal protective equipment including safety glasses, gloves, and steel-toe boots.
Taking time for these checks reduces downtime and safeguards both operator and machine before field work begins.
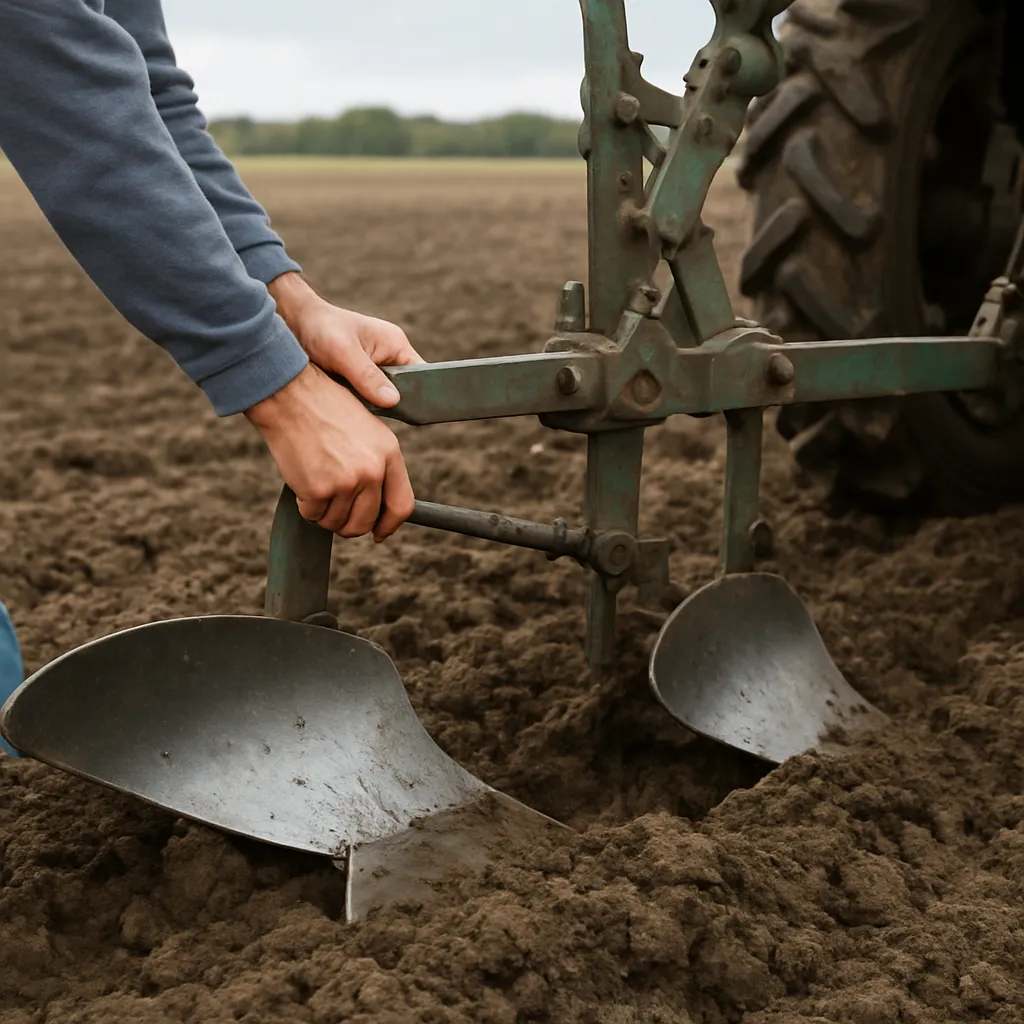
Hitching and Adjustments for Two-Bottom Plow Setup
Securing the Plow to the Tractor
- Lower the three-point hitch to ground level and align the lower arms with the plow’s hitch pins.
- Back up the tractor slowly, ensuring that both arms seat evenly on the pins. Install clevis pins and locking clips.
- Connect the top link and adjust to a neutral angle. A level plow frame is vital to consistent depth across both bottoms.
- Attach draft links or hydraulic hooks as specified in your tractor–plow manual to maintain correct load distribution.
Selecting the Right Skimmers and Coulters
Skimmers help move residue out of the way and prevent it from wrapping around moldboards. Coulters cut through heavy trash ahead of the plow points, reducing draft and improving turnover quality. Match coulter diameter and spacing to field conditions:
- Disc coulters for heavy residue or no-till situations.
- Shear-bolt or spring-trip skimmers for rocky soils to avoid damage.
- Adjust coulter skew to slice residue cleanly without excessive soil disturbance.
Properly aligned skimmers and coulters ensure that the main bottoms run clear and deliver crisp, well-formed furrows.
Adjusting Beam Pitch and Moldboard Tilt
Beam pitch governs how aggressively the moldboards flip the soil, while tilt controls the side-to-side roll. For a balanced setup:
- Set beam pitch so moldboards stand roughly 10–12 degrees off plumb for medium soils.
- Adjust tilt so the furrow slice wraps smoothly without pushing soil excessively sideways.
- Use the side-shift mechanism on wide plows to keep the plow beam directly behind the tractor’s centerline.
Steps to confirm correct angles include measuring from the top of the beam to the rear of the plow body and making small stepwise changes until the desired pitch and tilt are achieved.
Fine-Tuning Working Depth and Alignment
Proper adjustment of depth and tilt can eliminate “dished” or “high” furrows. Start with a shallow test pass:
- Set the depth screw or hydraulic cylinder to minimal penetration.
- Drive forward for at least three typical pass lengths, then inspect the furrow bottom.
- If one bottom runs deeper, adjust the length of the top link or lateral wheel until both bottoms cut uniformly.
- Check that each plow shoe supports the furrow bottom and that the beam sits level.
Once uniformity is achieved, gradually increase the depth setting to your target. Deeper cuts require slower travel speeds and may necessitate ballast adjustments on the tractor to maintain traction without slipping.
Optimizing Performance Through Regular Maintenance
Longevity of your two-bottom plow depends on routine care. Between seasons or heavy-use intervals, perform the following steps:
- Pressure wash moldboards and shares to remove caked-on soil and residue.
- Inspect hitch components for cracks or elongation in pin holes.
- Apply grease to all pivot points, including beam tilt cylinders and coulter bearings.
- Check bolts on share points and replace any worn or stripped fasteners.
- Rotate or reverse moldboards to equalize wear and extend the life of the plow body.
Off-Season Maintenance and Storage
When plowing season ends:
- Disassemble skimmers and coulters for separate cleaning and inspection.
- Touch up paint on exposed steel to prevent rust.
- Store the plow in a covered, dry area and elevate from direct ground contact.
- Run through a lubrication schedule every two months to prevent seals from drying out.
Consistent maintenance reduces downtime and preserves your investment over multiple seasons.
Troubleshooting Common Plowing Issues
Even with careful preparation, problems may arise in the field. Addressing these quickly prevents further complications:
Uneven Furrow Formation
If the furrows differ in height or shape, double-check alignment and depth settings. Verify that the tractor’s tire pressure is equal on both sides—unequal pressure can cause leaning and uneven penetration. Also confirm that the hitch arms are symmetrically adjusted.
Unclean Turnovers and Sticking Soil
When moldboards become clogged, the turnover quality suffers. Check for bent moldboards or worn surfaces. Increase speed slightly and verify that skimmers and coulters are keeping residue clear. In wet soils, consider shallower passes or waiting for better drying conditions.
Skipping, Mounding, or High Draft
Skip marks indicate the plow is riding over compacted or rocky spots. Reduce speed, lower the depth in these areas, and perform a preliminary pass with a disc to fracture hardpan. High draft can result from dull shares—keep cutting edges sharpened and replace them when thickness falls below manufacturer specs.
Advanced Strategies for Enhanced Soil Health
Implementing best practices ensures that long-term soil structure and fertility improve with each plowing season:
- Alternate plowing directions annually to counteract compaction and promote vertical root growth.
- Incorporate cover crops or green manures right before plowing to boost organic matter.
- Adjust plow width to match the tractor’s available horsepower and local field variability.
- Combine plowing with in-row incorporation of fertilizer or amendments to localize nutrient placement.
- Monitor long-term changes with soil tests, adjusting depth and rotation based on organic matter content.
By refining your approach continuously and combining careful maintenance with strategic planning, you’ll achieve better yields and enhanced field resilience year after year.
Incorporating Conservation Practices
While deep plowing can prepare seedbeds, consider ways to preserve soil structure and organic matter:
- Implement contour plowing on slopes to reduce erosion and water runoff.
- Retain windbreak strips or grass waterways to trap sediment and protect water quality.
- Use strip or zone tillage in alternating widths to maintain residue cover.
- Apply cover crops such as rye or clover and plow them in a living green state to add nutrients.
- Monitor long-term changes with soil tests, adjusting depth and rotation based on organic matter content.
By balancing conventional plow work with conservation methods, you can protect the topsoil and enhance productivity over time.